A Look into Intel DPDK and a Basic Forwarder
Introduction
The current Linux network stack, although very capable for general purpose applications, is unable to handle high throughputs required in applications such as the mobile core network processing.
This performance drop is mainly due to the number of levels the packets has to pass through before it is available to the user application. First, the packet, on arrival, is placed in the Rx/Tx queues of the NIC, then it is passed to the ring buffers from where the socket finally reads it and passes the data to the application running in the user space.
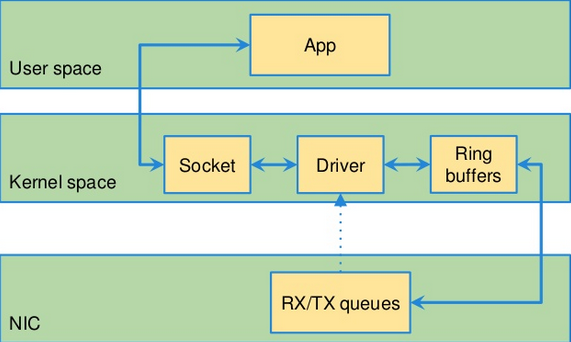
These steps involve much overhead due to the various system calls, context switches, and interrupt handling in the kernel.
Kernel Bypass
A typical modern NIC can handle a 10Gb throughput, which translates to around 1,230ns between two 1538-byte packet (LWN). A 100Gb interface drops the time further to around 120ns. This delay means that the interface is handling 8.15 million packets per second. However, the kernel is unable to process the packets at such rates, thereby becoming the bottleneck.
To get around the bottleneck, one mechanism to allow for faster processing involves a technique called “kernel bypass.” This technique, as the name suggests, involves bypassing the kernel completely. The mechanism requires us to move control of the Ethernet hardware directly into the userspace. This shift in control gives us a significant performance boost as there is no more overhead due to the Linux kernel.
This mechanism is what Intel DPDK utilizes to allow the user applications to communicate directly with the network devices.

DPDK provides a framework which makes many tasks essential to core networks, such as flow classification, traffic metering, and QoS management, very simple to handle.
To move the control of the NICs to the userspace applications, we must first unbind them from the kernel drivers and bind them to the drivers provided by DPDK. This binding/unbinding is carried out by utilizing a feature of the Linux kernel where every driver has bind and unbind files associated with it. To unbind a device from a driver, we must write the bus id of the device to the unbind file and to bind the device a kernel driver; we must write the bus id of the device to the bind file. Note that we must first ensure that no other driver is controlling the device before it is added to the bind file (manual-driver-binding).
DPDK Installation
In this tutorial, we are installing the DPDK 18.11.2 (Stable) version. It is present at Download. My setup is a Ubuntu 16.04.06 64-bit machine running as a VM with two network interfaces. On VMWare, we can add network interfaces by adding network adapters in the virtual machine’s settings page. Similar steps can be followed in VirtualBox.
System Requirements
Before we move on to the installation of DPDK, our system needs to have a few required tools, and libraries.
- make,
- GNU Coreutils,
- gcc version >= 4.9
- gcc-multilib,
- libnuma-dev,
- Python version 2.7+ or 3.2+
A more complete set of prerequisites are present at requirements.
Installation
On extracting the folder, we can go into the usertools/ directory. In this directory, a setup script (dpdk-setup.sh) is present which automates most of the steps required to set up the DPDK environment. Note that it is possible to compile and set up the environment manually, but in this tutorial, we are using the script.
Since it is an x86-64 architecture, I have selected the x86_64-native-linuxapp-gcc build (option 15).
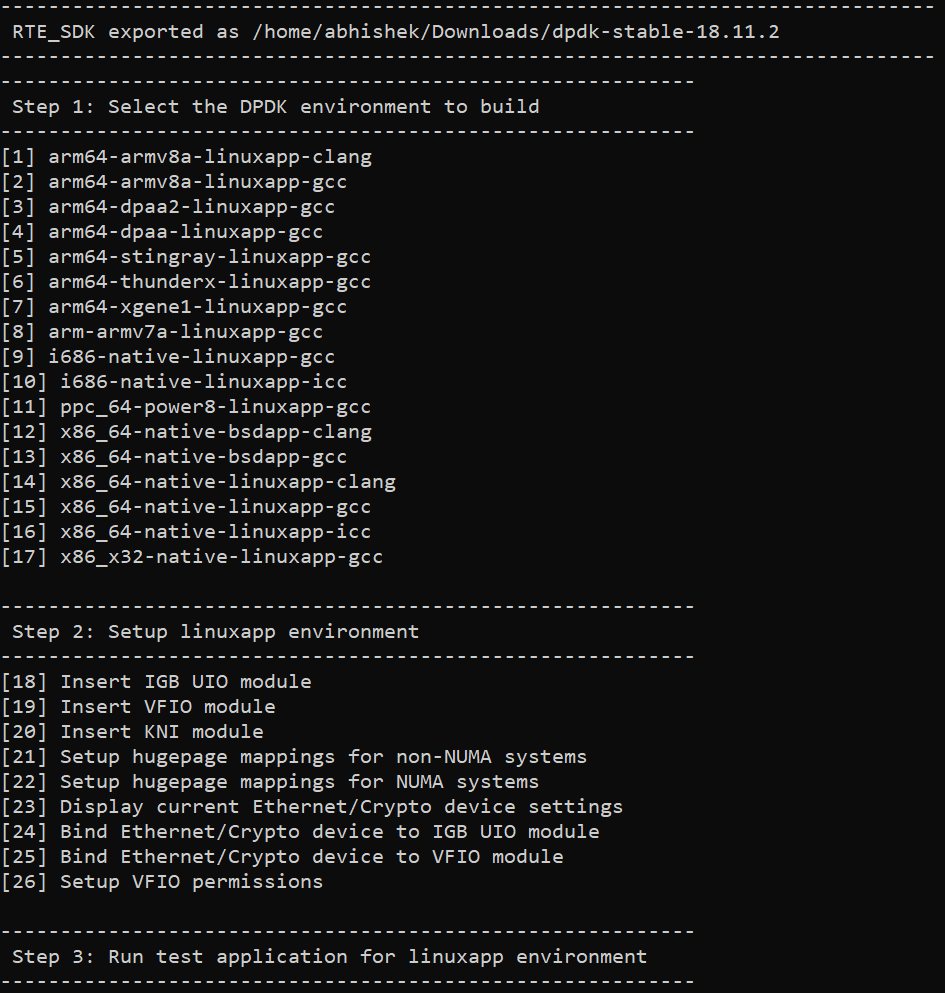
It starts building, and on completion, we are presented with the following screen.

Now, we can load the kernel module for the network interfaces. I am using the IGB UIO module for this tutorial. I have tried the other two modules but could not successfully bind them to the network interfaces. It is mentioned in the dpdk mailing list that the IGB UIO module should work for all the cases, but the other two modules (vfio and uio_pci_generic) have a few restrictions.
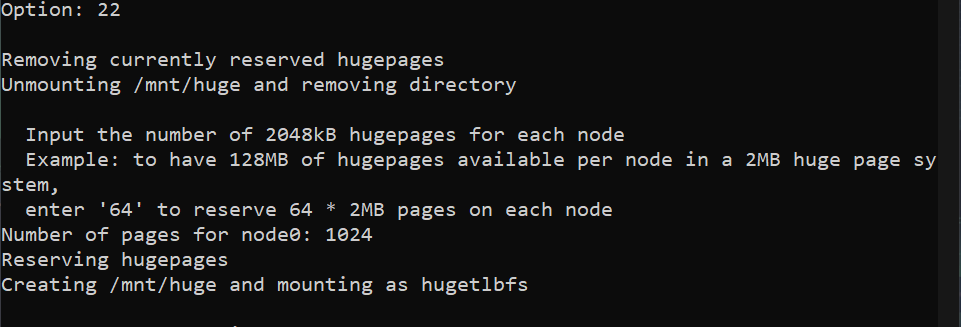
To load the module, we select the insert IGB UIO module option. Next, we have to set up the Hugepages which DPDK uses for allocating space for the packet buffers. The usage of Hugepages improves performance due to the reduced number of TLB misses. We use the setup HugePages for a NUMA system option and reserve 1024 pages. The script then reserves the Hugepage memory and makes it available to DPDK at the mount point /mnt/huge.
Now, we can take a look at our interfaces by selecting the option 23. On my system, the following interfaces are available.
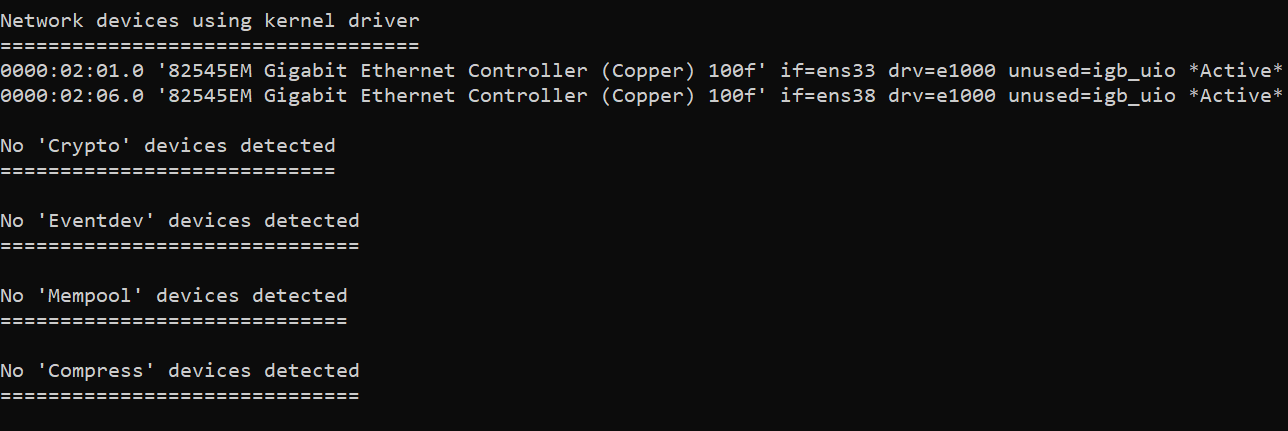
It shows that two interfaces, ens33 and ens38, are bound to the kernel driver. To use either of the interfaces in our applications, we must bind them to the igb_uio module. The binding is done by selecting option 24. If we get the message that the interface is active and is not modified

we can use another script in the same directory and force the bind using the following command:
sudo ./dpdk-devbind.py --force -b igb_uio <interface name or PCI address>
It now shows that the interface (ens33 in my case) is using the igb_uio driver.
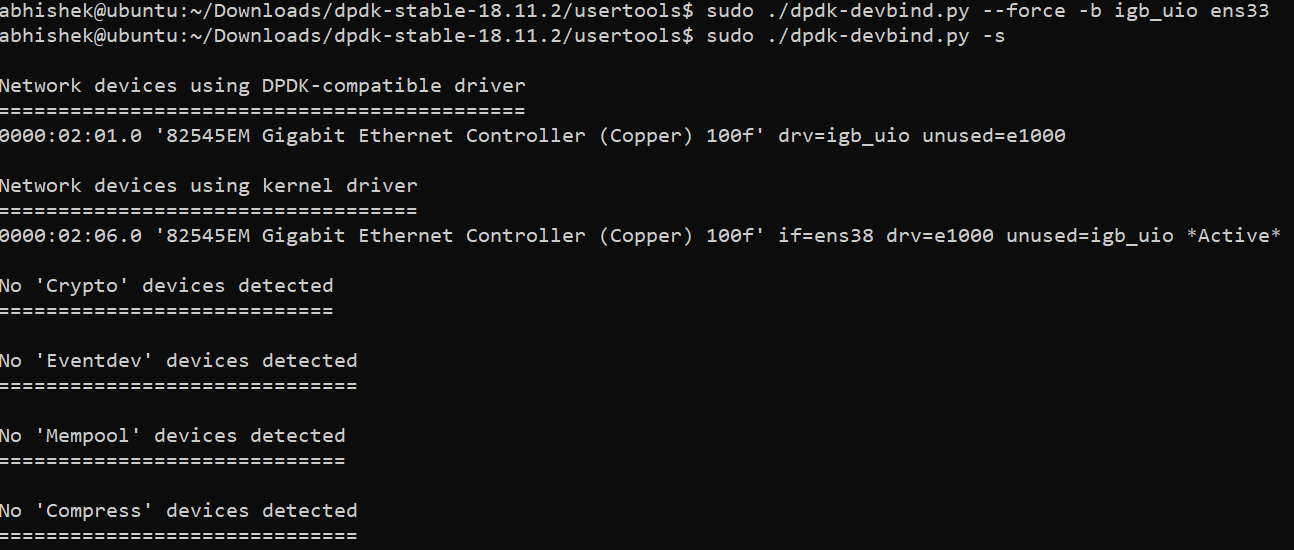
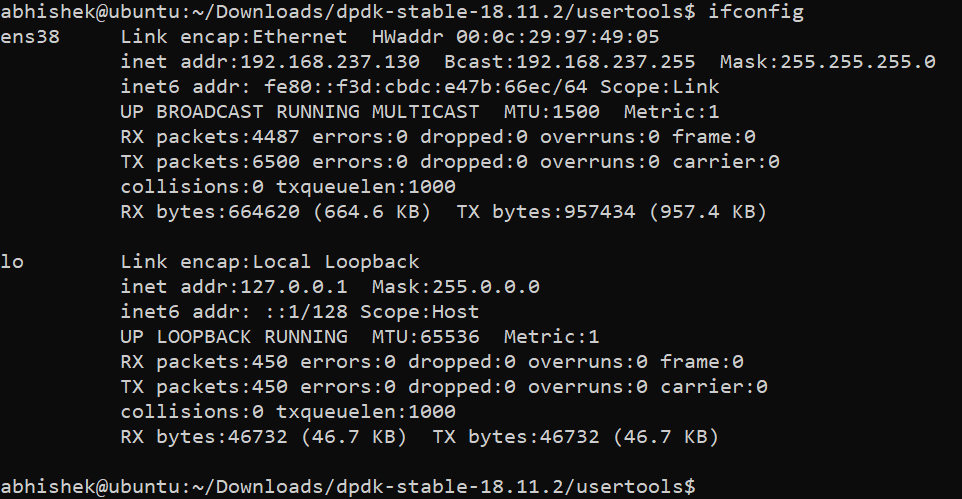
This means that the Linux kernel has no longer any control of the interface. This is confirmed by looking at the results of ifconfig. We see that ens33 is missing.
To test our installation, we can build the examples. Before that, we must, if not done already, set the following environment variables ($RTE_TARGET, and $RTE_SDK). They are set in the following manner.
cd /path-to-thetop-level-DPDK-directory/
export RTE_TARGET=x86_64-native-linux-gcc
export RTE_SDK=$(pwd)
Now we can compile our examples. We can either compile only the required examples or all of them. I have compiled all of them using the following command.
make -C examples/ RTE_SDK=$(pwd) RTE_TARGET=x86_64-native-linuxapp-gcc/ O=$(pwd)/build/examples
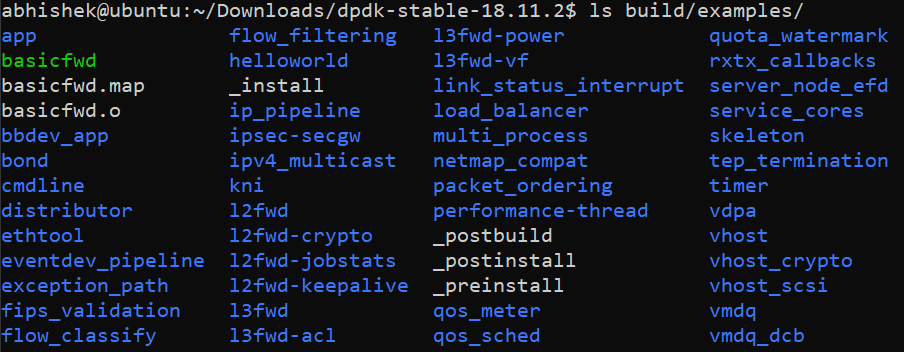
The built files are placed into the build/examples directory.
To test our build, we can use the standard hello world example. To run it, we type
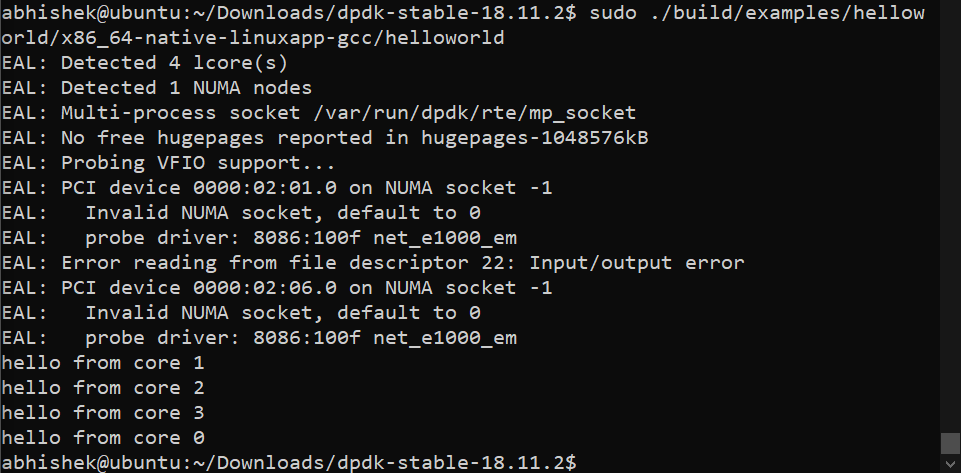
sudo ./build/examples/helloworld/x86_64-native-linuxapp-gcc/helloworld
We get the following output on running the above command.
Basic Forwarder
Next, we test the basic forwarder present in the skeleton/ directory. Note that this application requires that we have two ports, but since my setup is using only one, I have modified the program /examples/skeleton/basic-fwd.c in the following manner.
At line 175, change
if (nb_ports < 2 || (nb_ports & 1))
	rte_exit(EXIT_FAILURE, "Error: number of ports must be even\n");
to
if (nb_ports < 1) {
  rte_exit(EXIT_FAILURE, "Error: number of ports less than one\n");
}
Then at line 141, change
/* Send burst of TX packets, to second port of pair. */
const uint16_t nb_tx = rte_eth_tx_burst(port ^ 1, 0,
    bufs, nb_rx);
to
/* Send burst of TX packets, on the same port. */
const uint16_t nb_tx = rte_eth_tx_burst(port, 0,
                bufs, nb_rx);
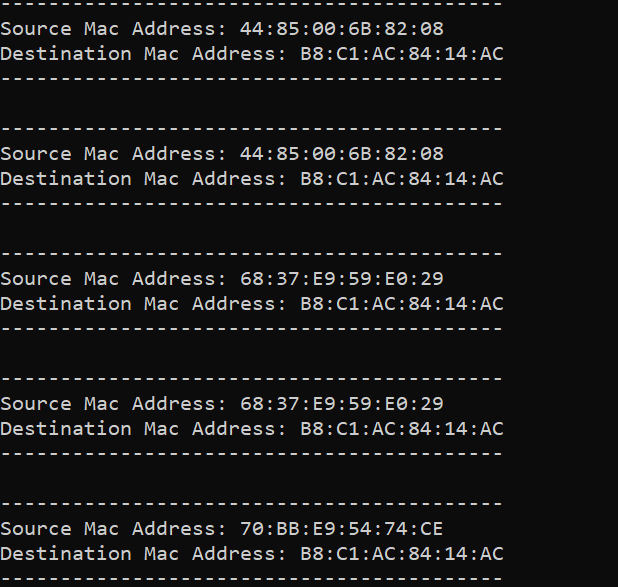
We also add the following code block, right after line 139, to print the mac addresses of the packets passing through.
for (int i = 0; i < nb_rx; ++i) {
struct ether_hdr *eth;
eth = rte_pktmbuf_mtod(bufs[i], struct ether_hdr *);
printf("\n------------------------------------------\n");
print_ether_addr("Source Mac Address: ", ð->s_addr);
print_ether_addr("\nDestination Mac Address: ", ð->d_addr);
printf("\n------------------------------------------\n");
}
We define the print_ether_addr() as follows.
static inline void
print_ether_addr(const char *what, struct ether_addr *eth_addr)
{
        char buf[ETHER_ADDR_FMT_SIZE];
        ether_format_addr(buf, ETHER_ADDR_FMT_SIZE, eth_addr);
        printf("%s%s", what, buf);
}
We can now compile the program using the command to compile all the examples. On running the program using the following command,
sudo ./build/examples/skeleton/x86_64-native-linuxapp-gcc/basicfwd
we get the following output.
This is the end of my first blog post. Please let me know if you have any suggestions.